 When I first started in culinary school, we were told that if we wanted to become a (master)baker or (head)chef, we would have to learn the basics. For cooking that meant learning how to boil (eggs, potatoes...), for baking that meant bread. To this day, nothing beats the feeling of accomplishment when I pull out a golden-crusted loaf of bread; crispy on the outside, light and fluffy on the inside. And then the first slice, still warm from the oven, with nothing but a good smear of real butter: heaven on a plate.
The flours that are most used for bread are white and wholemeal. And both of these flours bring their own characteristics to bread. My preference is wholemeal: slightly nutty and sweet in flavour, with the added bonus of a gorgeous texture. Sometimes mixed with white flour to create a lighter loaf, sometimes (partly) sifted to lose some of the wheat.
Someone, years ago, bought me a bread-maker because that would make my life so much easier (and less messy). I wouldn't have to do all the hard work of kneading dough, letting it proof, kneading again, shaping, rising and (finally) baking. 'You can just chuck it all in, set the timer and, hey-presto, fresh bread'. Although I had my doubts, I tried it, and tried it, and tried it. For me, it never worked: ingredients weren't mixed in well enough, or the bread would be too dense, or the little mixer thingy would be stuck in the loaf. Safe to say, it wound up in the back of a cupboard, never to be looked at again. My hands, a flat surface, a bowl and a set of scales are all I need to create the perfect loaf time and time again.
The most difficult thing about baking bread is the kneading but with some simple hints and tips that becomes as easy as 1, 2, 3. So, here goes:
After you have mixed all the ingredients (recipe below, but this is the same for all bread dough) together in a bowl and brought it together into a ball, turn it out onto a lightly floured surface and lightly flour your hands,
- Form the dough into a nice, thick package by folding it over onto itself and pressing down, giving it a quarter turn after each fold. Do this several times. If your dough sticks to the counter: gently lift it up and sprinkle some more flour onto the surface before putting your dough down again. Now you are ready to start the actual kneading:
- Hold the dough along the left side with your left hand
- Grip the furthest edge with your right hand and gently stretch that part away from you (this is an almost rolling action, with the heel of your hand)
- Push it down gently to the counter with your palm
- Pull the edge back on top of the rest of the dough
- Give the dough a quarter turn and repeat these steps, being careful not to tear the dough as you stretch it. Flour the surface and your hands as and when needed, to prevent sticking.
This YouTube video from +Epicurious gives you a step-by-step guide if you would like to see what to do:
Wholemeal Cottage Loaf
Ingredients: (enough for 2 loaves)- 60 gram (unsalted) butter (plus extra for greasing)
- 3 tablespoons honey
- 3 teaspoons dried yeast
- 1 tablespoon salt (half if you have used salted butter)
- 625 gram (stone-ground) strong wholemeal bread flour
- 125 gram strong white bread flour (plus extra for dusting)
- 400 ml lukewarm water (stone-ground wholemeal flour can vary in its absorbency and you may need more or less flour or water)
Method:
- Melt the butter
- Mix 1 tablespoon of honey and 4 tablespoons of lukewarm water in a bowl. Sprinkle the yeast on top and leave it for 5 minutes to dissolve, stirring once
- Mix the butter, yeast mixture, salt, remaining honey and the rest of the water
- Stir in the white flour and half of the wholemeal flour and mix it with your hands
- Add the remaining wholemeal flour, 125 gram at a time, mixing after each addition. The dough should be soft and slightly sticky, and start to pull away from the sides of the bowl
- Turn the dough out onto a lightly floured surface and sprinkle the dough with a bit more flour
- Knead the dough for 10 minutes (see above) until it is smooth and elastic
- Grease bowl with a bit of butter, put the dough in the bowl and flip it to lightly butter the surface
- Cover the bowl with a slightly damp tea towel and leave it in a warm place for an hour to an hour-and-a-half until the dough has doubled in size
- Turn the dough out of the bowl and give it a quick knead to bring it back into a ball shape (knocking the dough back)
- Cover the dough and let it rest for 5 minutes whilst you grease a baking sheet. After you have let the dough rest, cut it into three equal-sized pieces and cut one of the pieces in half
- Cover 1 large and 1 small piece of dough with a slightly damp tea towel whilst shaping the other two pieces:
- Shape 1 large piece into a loose ball and put it on the surface
- Cup your hands on either side of the dough ball and gently fold the sides in towards the bottom by bringing your hands together, turn the dough and repeat. Do this several times to create a tight ball
- Flip the ball, seam-side down, onto the grease baking sheet
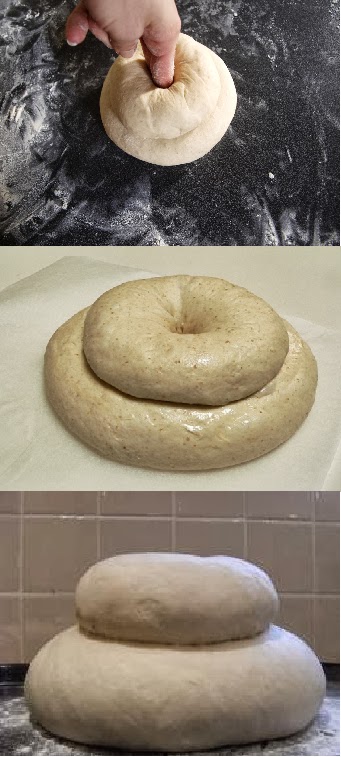
- Follow step 1, 2 and three with 1 small piece of dough and place this, seam-side down again, on top of the first ball
- Using your forefinger, or the handle of a wooden spoon, press through the centre of the dough balls all the way down to the baking sheet
- Repeat with the other 2 pieces of dough to form a second loaf
- Cover both loaves with a tea towel and leave to rise, in a warm place, for about 45 minutes or until doubled in size
- Whilst the loaves are rising, pre-heat the oven to 190ºC (375ºF/Gas 5)
- Bake the loaves for 40-45 minutes until well browned
- To test if the loaves are completely baked, turn the upside-down and tap the bottom with your knuckles: if the taps sound hollow, your bread is baked. Leave to cool on a wire rack
.jpg)
No comments:
Post a Comment