
The dictionary states "tradition: a belief, principle, or way of acting that people in a particular society or group have continued to follow for a long time, or all of these beliefs, etc. in a particular society or group".
Traditions come and go, change over time or our understanding of traditions change. Family traditions disappear as families move on, national and even international traditions are forgotten or are adapted to fit cultural and religious beliefs.
 My family had a tradition: we celebrated St Nicholas, on December 5 or 6; gifts for all, sometimes accompanied by (funny) riddles or puzzles and at least one per person had an indicative poem. Christmas, however, was an individual family feast. A, real, tree (with real candles and a bucket of water), scrumptious food but only one present; my grandfather used to buy a book for each of his children and grandchildren at Christmas. A tradition I still, very much, appreciate but that has petered out as the family moved on.
Christmas itself is one of those international traditions that has changed over time and our understanding of it has changed dramatically over the centuries. Who, for instance, knew that it has its roots firmly in Roman times as Saturnalia, later used by the Christians to 'convert' Pagans. Or that the oh so popular term 'Xmas' is based on the Greek for Christ: 'Xristos'. Did you know that the modern-day Santa Claus was 'born' in 1931? Nicolas was born in Parara, Turkey (270-345 AD) and later became Bishop of Myra. He didn't become a Saint until the 18-hundreds. In 1087 his remains were brought to Bari, Italy, where he replaced Pasqua Epiphania (the Grandmother) and became the giver of gifts and a cult was formed. This cult was adopted by German and Celtic pagans and Nicolas merged with the Norse god Woden. Nicolas shed his Mediterranean appearance, grew a long white beard, mounted a flying horse and rescheduled his flight from Autumn to December, whilst donning some heavy winter clothing. The Catholic Church adopted the Nicolas cult and moved his flight and giving of gifts from December 6 to 25 to bring it in line with Saturnalia.

Then, in 1809, Washington Irving wrote a satire of Dutch culture (Knickerbocker History) which featured Nicolas using his Dutch name Sinterklaas or Santa Claus. In 1822, Dr Clement Moore based his 'Twas the night before Christmas' on Irving's work and gave Santa Claus his eight reindeer. Thomas Nast, a Bavarian illustrator, (almost) completed Santa's picture by giving him a home on the North pole, filling his workshop with elves and his list of naughty and nice children. And then, in 1931, Coca-Cola contracted Swedish artist Haddon Sundblom to create a coke drinking Santa. Sundblom modeled his version of Santa on a friend with a cheerful, chubby face and donned him in a fur-trimmed, Coca-Cola red, suit: Santa was born, a blend of Christian crusader, pagan god, and commercial idol.
My all-time favourite 'snack' at Sinterklaas and Christmas is an almond paste filled stave or wreath: moorish and sweet almond paste encased in puff pastry, decorated with (very seventies) glacé cherries or whole almonds.
 Ingredients:
Christmas Wreath
(not for decoration)

Almond paste
250 gram ground almonds
- 250 gram granulated sugar
- 2 whole eggs, lightly beaten
- zest of 1 lemon
- 5 teaspoons lemon juice
Method:
Almond paste
Almond paste
- Add the ground almonds and sugar to a food mixer and give it a quick mix
- Turn the mix into a bowl and add the eggs, lemon zest and juice
- Give it a quick mix to form a paste
Wrap the paste in cling film and leave to rest. The longer it gets to rest the better developed the flavour will be and the paste can be made several weeks in advance and kept in the fridge.
When you are ready to make the wreaths:
Make puff pastry (see here for ingredients and method), you will need approximately one-third of the recipe, and leave to rest in the fridge (I find it easier to make the recipe as is and just divide it into three, even, pieces). You can, of course, also use ready-made puff pastry, or even rough-puff pastry.
Method:
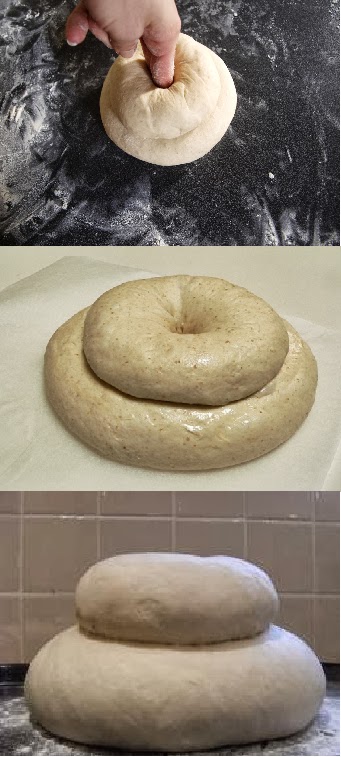
Christmas wreath

Make puff pastry (see here for ingredients and method), you will need approximately one-third of the recipe, and leave to rest in the fridge (I find it easier to make the recipe as is and just divide it into three, even, pieces). You can, of course, also use ready-made puff pastry, or even rough-puff pastry.
Method:
Christmas wreath
- Separate one egg and loosely whisk the egg white
- Beat the egg yolk with a little milk
- Roll the puff pastry out to approx. 1.5 cm thick, 10 cm wide and 64 cm long
- Straighten the short sides with a knife
- Take the almond paste and form this into a roll slightly shorter than the length of the pastry
- Place the role of almond paste in the middle of the pastry so that the edge of the roll is flush with the pastry
- Fold one of the long edges of the pastry loosely over the almond paste
- Brush the other edge with the beaten egg white and fold it over the first layer and gently press the two layers together
- Gently push the edge of the pastry with the almond paste into the pastry without the paste, make sure the stuffing fits well, to form a circle (the wreath)
- 'Glue' the seam with a bit off the egg white
- Place the wreath, seam side down, on a wet baking tray (re-shape if necessary)
- Brush the wreath with the beaten egg yolk and let it rest for 30 minutes in the fridge to firm up
- Preheat the oven to 200ºC
- Brush the wreath again and place in the bottom of the oven
- Bake in 30 to 40 minutes until golden brown and cooked, do not open the oven door during the first 15 minutes of baking
- Release the wreath from the tray and leave to cool
Traditionally, the wreath is decorated with glacé cherries or whole white almonds but you could decorate it with little stars, bells and holly leaves made out of marzipan or chocolate.
Variation:
Variation:
- If you have made your own puff pastry:
- After resting for the last time (after turn 6), divide the pastry into three even pieces by eye and cut one-third off (wrap the largest part back in cling film and put it back into the fridge)
- Roll the dough out in one direction (do not roll out the sides) into an elongated rectangle. Remember to flour as you roll when you feel the dough is sticking to your work surface, otherwise the butter will peep out of the dough and your layers will be ruined. Also, if butter does leak out of the dough, then put it back in the fridge
- Brush off the excess flour and sprinkle the top with ½ to 1 tablespoon cinnamon or mixed spice
- Fold the rectangle into thirds, brushing off the excess flour and sprinkling with cinnamon or mixed spice as you go
- The pastry will be slightly drier when baked
- Wrap the pastry in cling film and let it rest in the fridge for 30 minutes
- Repeat this one more time
- After the (in total) eighth turn, follow the recipe as above for the Christmas wreath
- If you use ready-made puff pastry:
- Roll the puff pastry out to approx. 1.5 cm thick, 10 cm wide and 64 cm long and straighten the short sides with a knife
- (Sprinkle the pastry with 1 tablespoon cinnamon or mixed spice)
- Follow the recipe as above for the Christmas wreath
- If you use rough-puff pastry:
- Mix 1 tablespoon cinnamon or mixed spice in with the flour and make the pastry as usual
- Roll out the pastry and follow the recipe as above for the Christmas wreath
- Spread evenly underneath the apples in an apple pie (recipe to follow soon) (also very nice in a pear tart)
- Place dots of the paste on top of any fruit pie or tart, this way the paste will become slightly crunchy and caramelised
- Almond paste is essential in the making of traditional 'Stollen', a fruit 'bread' eaten at Christmas and Easter in The Netherlands and Germanic countries. I will put up a recipe very soon, as Christmas is only 58 days away, but here is a photo:
As they say in The Netherlands:
Veel plezier en eet smakelijk
Or, in English,
Have fun and enjoy


.jpg)


