Our biggest passion in life is food, in all its many various forms. Here, we share our recipes and stories around food with you. Stories that are often personal or that contain a lot of history. Click on the links to the right for just the recipes, or continue reading below for an insight in our lives or the history of much-loved recipes.
Use the comments section below, to let us know what you think or any questions you might have.
Those of you who know me, know that I love bread. Fresh white, still warm from the oven, with loads of real butter; crusty brown with cheese; stale, so that I can use it for bread-and-butter pudding; white or brown, toasted, with marmalade; eggs and soldiers. There is something comforting, homely and wholesome about bread. More so than anything else, in my (not so) humble opinion. Breakfast, and dinner, just wouldn't be complete without it. Throughout Europe, you can find festive loafs for all kinds of occasions. Pretzels (Germany) were traditionally eaten at New Year; the dough would contain lemon peel, cut into three even pieces and braided and then shaped into a pretzel shape and baked (no salt on top). Braid(Switzerland), traditionally eaten at breakfast on festive days; cut into two even pieces for a 4-part braid. Easter Bread (Finland), as the name suggests, eaten at Easter; the dough is made with condensed milk and contains dried fruit, citrus peel,
cardamom and almonds and is baked in an enamelled pan. Vasilopita (Greece), traditionally eaten on the first day of the year to celebrate St Basilius; a golden or silver coin is baked inside the dough (whoever finds it will have a year of good fortune). All Souls 'Braid' (Bavarian), eaten on All Hallow's Eve; the dough is cut into thirty-six pieces and shaped into a complex braid before being baked.
This is just a very, very, very small selection and if I were to look at the various 'plain' breads I could fill three posts with just the variations of breads within Germany, where every region has its own breads. In Germany and the 'low countries' it is traditional to eat Stollen at Christmas and Easter. The bread is chock-full of dried fruits, candied peel, almond paste and wears a pretty coat of icing sugar and slightly browned almond slivers. (As breads go, you could go worse.) The tradition of eating Stollen at Christmas dates back to the 1400s; it was created for the first time in 1427 at the Saxon Royal Court in Dresden and was made with flour, yeast, oil and water, the result was a 'bread' that was very hard and rather tasteless. In those days the Advent season was one of fasting and bakers were not allowed to use butter. That changed in 1490,
when Pope Innocent VIII allowed the Prince Elector Ernst, his family and household to use butter. If other people wanted to use butter, they could do so but had to pay an annual fee (this fee was used to build the Freiberg Minster. When Saxony became Protestant the ban on butter was lifted. Over the years the hard, tasteless 'bread' evolved into a lighter, sweeter cake with richer ingredients such as almond paste and dried fruits. But the traditional Stollen that is still baked in Dresden is not as light, airy and sweet as copies that are now made the world over. It is best to bake the bread a couple of days in advance as the flavours will mature a bit and the bread will get slightly denser. Good (finger thick) slices, served with real butter and a slice of good cheese (optional). Grilling or toasting the bread works a treat as the sugar in the almond paste will start to caramelise. And so, as promised in my blog on 27 October: Tradition, here is the recipe for this tasty bread.
Christmas Stollen
Ingredients:
4 teaspoons dried yeast (20 gram) (you can use fresh yeast, you will need about 50 gram)
½ teaspoon cinnamon, mixed in with the icing sugar (optional)
toasted almond slivers for garnish (optional)
Method:
Add the yeast to the warm milk and leave until it becomes 'creamy', about 10 minutes (if you are using fresh yeast, crumble the yeast into the milk and leave until dissolved)
In a separate bowl, mix the dried fruit, candied peel (recipehere) and glacé cherries
In a large bowl, mix the yeast mixture with the eggs, icing sugar, salt, butter and three quarters of the flour and mix thoroughly
In small quantities, start adding the rest of the flour and knead this into the dough
As soon as the dough comes together into a ball and is releasing from the sides of the bowl, turn it out onto a lightly flour work surface and knead in the mixed dried fruits
Keep kneading until the dough is smooth and elastic, about 8 minutes
Oil a large bowl, put the dough in the bowl and turn it around a couple of times to cover it in the oil, cover the bowl with a damp tea towel and leave the dough to prove, in a warm and draft-free space, until it has doubled in size, about 1 hour
Grease a baking sheet, ready for when the bread is shaped
Take the dough out of the bowl onto a lightly work surface and beat it back, form the dough into a big square
Form the almond paste (recipe here) into a roll and put this in the middle of the dough (see right)
Fold one half of the dough over the almond paste and press the seam down (traditional, see below for photo)
Place the loaf onto the baking sheet, cover with a damp tea towel and leave to rise until doubled in size, about 40 minutes
Preheat the oven to 180ºC
Put the baking sheet (with the loaf) into the oven and bake for 10 minutes
Lower the temperature to 150ºC and bake for a further 30-40 minutes until the bread is a lovely dark golden colour
As soon as the bread is out of the oven, brush with a little melted butter and sprinkle the toasted almond slivers over the (now) sticky bread
Leave the bread to cool on a rack
Sift the icing sugar (mix in the cinnamon, if using) over the cooled down bread
Variations:
You can change the taste of the bread by adjusting the quantities of dried fruit, candied peel and glacé cherries to your own taste
For a fruity burst, replace the raisins with 150 gram dried cranberries
You can add dried apple and/or pear, replacing the glacé cherries
For a slightly more 'adult' version, try soaking the dried fruit in either rum or brandy
Leave the fruit to soak as long as possible, preferably over night, but for a minimum of 1 hour
drain any leftover liquid off the fruit and add it to the milk in step 3
If you don't want to use alcohol for soaking the fruit, try using tea but do not use the leftover liquid in the dough
You can add 2 teaspoons of your favourite 'Christmas' spice(mix), such as cinnamon, to the flour
Mix even quantities of ground cinnamon, ground ginger and ground nutmeg and about half the used quantity of ground cloves and add two teaspoons of this mix to the flour (I usually make a larger quantity and use this to bake spiced Christmas cookies and spiced Christmas Wreaths)
If you want to use star anise, add two stars to a pan with 350 millilitre cold milk and slowly bring to a simmer, leave to cool to 45ºC. Remove the stars before you add the yeast (step 1)
You could use the Stollen as a centre piece on the table:
Once you have reached step 9, place the 'loaf' inside a greased 'turban' mold and follow the rest of the steps
After the bread has cooled down and has been dusted with the icing sugar, place on a large serving platter and place a candle in the centre of the bread
When I first started in culinary school, we were told that if we wanted to become a (master)baker or (head)chef, we would have to learn the basics. For cooking that meant learning how to boil (eggs, potatoes...), for baking that meant bread. To this day, nothing beats the feeling of accomplishment when I pull out a golden-crusted loaf of bread; crispy on the outside, light and fluffy on the inside. And then the first slice, still warm from the oven, with nothing but a good smear of real butter: heaven on a plate. The flours that are most used for bread are white and wholemeal. And both of these flours bring their own characteristics to bread. My preference is wholemeal: slightly nutty and sweet in flavour, with the added bonus of a gorgeous texture. Sometimes mixed with white flour to create a lighter loaf, sometimes (partly) sifted to lose some of the wheat. Someone, years ago, bought me a bread-maker because that would make my life so much easier (and less messy). I wouldn't have to do all the hard work of kneading dough, letting it proof, kneading again, shaping, rising and (finally) baking. 'You can just chuck it all in, set the timer and, hey-presto, fresh bread'. Although I had my doubts, I tried it, and tried it, and tried it. For me, it never worked: ingredients weren't mixed in well enough, or the bread would be too dense, or the little mixer thingy would be stuck in the loaf. Safe to say, it wound up in the back of a cupboard, never to be looked at again. My hands, a flat surface, a bowl and a set of scales are all I need to create the perfect loaf time and time again. The most difficult thing about baking bread is the kneading but with some simple hints and tips that becomes as easy as 1, 2, 3. So, here goes: After you have mixed all the ingredients (recipe below, but this is the same for all bread dough) together in a bowl and brought it together into a ball, turn it out onto a lightly floured surface and lightly flour your hands,
Form the dough into a nice, thick package by folding it over onto itself and pressing down, giving it a quarter turn after each fold. Do this several times. If your dough sticks to the counter: gently lift it up and sprinkle some more flour onto the surface before putting your dough down again. Now you are ready to start the actual kneading:
Hold the dough along the left side with your left hand
Grip the furthest edge with your right hand and gently stretch that part away from you (this is an almost rolling action, with the heel of your hand)
Push it down gently to the counter with your palm
Pull the edge back on top of the rest of the dough
Give the dough a quarter turn and repeat these steps, being careful not to tear the dough as you stretch it. Flour the surface and your hands as and when needed, to prevent sticking.
You'll want to knead vigorously for about eight to ten minutes or until the dough reaches a smooth, elastic texture. This will take longer if you are kneading a big batch of dough or if the dough contains a lot of egg or butter. If your dough looks silky smooth and elastic, test the dough to see if it has been kneaded enough: press on the dough gently with two fingers, if the indentation stays after you take your fingers away you are done kneading. This YouTube video from +Epicurious gives you a step-by-step guide if you would like to see what to do:
Wholemeal Cottage Loaf
Ingredients: (enough for 2 loaves)
60 gram (unsalted) butter (plus extra for greasing)
3 tablespoons honey
3 teaspoons dried yeast
1 tablespoon salt (half if you have used salted butter)
125 gram strong white bread flour (plus extra for dusting)
400 ml lukewarm water (stone-ground wholemeal flour can vary in its absorbency and you may need more or less flour or water)
Method:
Melt the butter
Mix 1 tablespoon of honey and 4 tablespoons of lukewarm water in a bowl. Sprinkle the yeast on top and leave it for 5 minutes to dissolve, stirring once
Mix the butter, yeast mixture, salt, remaining honey and the rest of the water
Stir in the white flour and half of the wholemeal flour and mix it with your hands
Add the remaining wholemeal flour, 125 gram at a time, mixing after each addition. The dough should be soft and slightly sticky, and start to pull away from the sides of the bowl
Turn the dough out onto a lightly floured surface and sprinkle the dough with a bit more flour
Knead the dough for 10 minutes (see above) until it is smooth and elastic
Grease bowl with a bit of butter, put the dough in the bowl and flip it to lightly butter the surface
Cover the bowl with a slightly damp tea towel and leave it in a warm place for an hour to an hour-and-a-half until the dough has doubled in size
Turn the dough out of the bowl and give it a quick knead to bring it back into a ball shape (knocking the dough back)
Cover the dough and let it rest for 5 minutes whilst you grease a baking sheet. After you have let the dough rest, cut it into three equal-sized pieces and cut one of the pieces in half
Cover 1 large and 1 small piece of dough with a slightly damp tea towel whilst shaping the other two pieces:
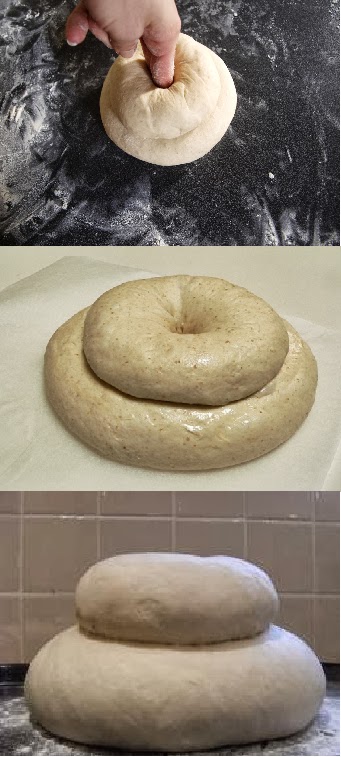
Shape 1 large piece into a loose ball and put it on the surface
Cup your hands on either side of the dough ball and gently fold the sides in towards the bottom by bringing your hands together, turn the dough and repeat. Do this several times to create a tight ball
Flip the ball, seam-side down, onto the grease baking sheet
Follow step 1, 2 and three with 1 small piece of dough and place this, seam-side down again, on top of the first ball
Using your forefinger, or the handle of a wooden spoon, press through the centre of the dough balls all the way down to the baking sheet
Repeat with the other 2 pieces of dough to form a second loaf
Cover both loaves with a tea towel and leave to rise, in a warm place, for about 45 minutes or until doubled in size
Whilst the loaves are rising, pre-heat the oven to 190ºC (375ºF/Gas 5)
Bake the loaves for 40-45 minutes until well browned
To test if the loaves are completely baked, turn the upside-down and tap the bottom with your knuckles: if the taps sound hollow, your bread is baked. Leave to cool on a wire rack


.jpg)